Introduction to the dev. bootcamp
![]()
Hey There :)|
Welcome to the first Hack frost developer toolkit bootcamp! Our mission at Hack Frost is to bridge the gap between the classroom and the workplace. As students ourselves, we noticed that there is a gap between the content taught in the classroom and the tools and skills applied in the workforce; we are determined to help students around the world learn the newest industry standard tools, skills, and technologies to ease their entry to the workforce. Help us build this bridge by spreading the word about our events!
This bootcamp is one of our first building blocks for our mission. In this bootcamp we will together use industry standard technologies in conjunction to fully build and deploy a customizable portfolio and blogging application. We will start at the very basics and go through theory, design, development and deployment. We hope you enjoy the sessions and please feel free to shoot us a message on discord if you have any questions, concerns or recommendations 😊 see you all soon!
Format Overview
This bootcamp is organized into a few different things:
- This site you are currently on, which contains information about the event itself, and each of the different sections.
- Each of the 90 minute Zoom sessions, which will be covering the different sections within this document, that are not required to be attended, since they will be recorded.
- The
bootcamp-*channels over in the Hack Frost NL Discord server, for any issues you run into, or clarifications about the content found in the docs, the sessions, and even the internet in general.
Also, some notes:
- In places in which we can refer to external sources instead of writing it all ourselves within this documentation, we will; there are better descriptions of things such as Flask and HTTP than what we can provide, so we'll do our best to link to the best sources on these topics.
- We're not perfect; if you have any recommendations or critiques regarding the event, feel free to let any of the organizers know!
Deliverables
During this bootcamp, learning is important, but something just as important as learning is putting things into practice.
Within the field of software development deliverable is a 'good or service produced as a result of a project that is intended to be delivered to a customer'.
Think of us, the organizers, as your customer; what you do during this event can be considered your deliverables for us!
Broken down into sections, the deliverables are as follows:
1. Hello World Flask Application, with a twist
- Develop a Flask application, potentially using one of the examples provided in the Flask section of these docs as a base.
- But, put your own twist on it, such as maybe making it 'return a random fruit name in comic sans', or a 'rainbow that changes over time'.
- Try not to go overboard since this is not the main deliverable, but still try to have some fun with it!
Extra Credits
These are things that are more nice to haves rather than requirements, which are obviously separate to the above tasks, but are listed her more for fun and exploration than anything else.
Extra 1. Show us your rice
The first moments of this bootcamp mention the terminal and editors, so why not take the best screenshot of your setup you can take?
Ricing in this context, is likely best understood by visiting this subreddit and consuming a few of the top posts; these are riced out setups.
If it's just a terminal theme, a VS Code theme, a cool font with ligatures, or a vanilla editor against your wall paper, we want to see it!
Extra 2. Use GitHub Issues
Once you put your code up on GitHub, which you should be doing all the time even from the start, spend some time getting to know GitHub issues, and maybe even use them to keep track of the deliverables!
Sessions
Each session will take place on Zoom, and will be recorded and posted on our YouTube afterwards, the actual contents of each session is tentative to how the previous one goes, so not everything is fully planned out ahead of time.
Session 1
Intro & Version Control
July 17th, 1pm NL Time
Introduction 00:00
- Cover goals of this bootcamp, the timeline, and other high level items
- Talk about the team behind Hackfrost NL, and where you can find us online
Terminals 13:26
- Terminal configuration
- Useful commands
- File management
VS Code 24:09
- VS Code overview
- Editing code tricks
- Installing Flask
- Starting virtual environment
- Writing flask hello world
- Running the application locally
Git / GitHub 38:49
- What is Git?
- What is GitHub?
- Create a Repository
- Clone it locally
- Make a Commit
- Create an Issue
- Make a Commit fixing the Issue
- Close the Issue
HTTP 1:07:33
- What exactly is a 'URL'?
- Routes, and their handlers
- Client and Servers
Session 2
Backend
July 18th, 1pm NL Time
1:00 - 10m - Deliverables
1:10 - 10m - HTML & CSS
- What are HTML tags?
- Proper page structure 'skeleton'
- HTML Tags,
<p>,<img>,<input>,<ul>/<ol> - Adding a stylesheet
1:20 - 15m - Templates
- Recap on adding templates
- What we're going to build; super simplistic portfolio page
- Passing arguments to templates
- Iterating over lists within templates
- Conditional statements within templates
- Template inheritance for deduplication
1:35 - 15m - APIs
- Installing the requests library
- Inspecting the GitHub API
- Using requests to store the data inside our application
- Inserting data thats not on GitHub
- Building the template required to render the data for the projects page
1:50 - 15m - Forms / Contact Page
- Using Formspree to create a URL for you
- Building the contact template
- Testing it out
- Install the decouple library so we don't have to include the Formspree URL in our code
2:05 - 20m - Introduction SQLite
- Installing the sqlite3 library
- Show the reactions example on the example portfolio page
- Create a simple database with a single table
- Add some things to it
- Query those things
- Delete some things
- Build some basic routes to do the above things
Session 3
Cloud Hosting
Session 4
UI Design
Initial Setup
Install Python
Ensure you are using the latest version of Python! At the time of this bootcamp, it is at 3.9.6!
Older versions may be fine; Python 2 most definitely will however not be.
Installing Python is platform specific, you can follow instructions for installing on either Windows, Mac, or Linux.
Create a GitHub account
Learning how to use GitHub is a great asset for any sort of developer, so we're going to be encouraging all work you do to be done inside a repository on GitHub, both for help with issues, and showing off your work, join here.
Create a Python Anywhere account
Python Anywhere is our hosting platform of choice, if you feel comfortable using something else feel free, but we picked it because:
- It has relatively friendly UI
- Its file system doesn't get wiped on an interval, and since we are using SQLite which saves its database to a file, we need this property
- It's free! the free tier is as expected limited, but there is no upfront cost to using the site
This step is only really required once you have code you are ready to deploy, but even while you are running hello world programs, testing them out on a real server anyone on the internet can access is good practice.
Windows
Steps here are specific to Windows, don't forget to check the general initial setup as well!
WSL
To make the most out of the sessions, we're kindly asking all Windows users to download Windows Subsystem for Linux.
This will give you a Linux environment within Windows, such that everyone taking this bootcamp will have a similar setup.
Learn more here on Microsoft's own documentation.
Once you are done installing WSL, you can follow most of the instructions over in the Linux section.
However, if for some reason you are not able to install WSL (or don't want to), you may still complete the bootcamp using just Windows, but you will need to figure out the Windows alternatives to commands we will be running, and software we will be installing.
VS Code
Visual Studio Code + WSL = <3
Thankfully, you can install VS Code on your host machine, and use it to remotely develop within WSL.
Terminal
If you follow the above steps to hook up VS Code, it might be useful to just use the terminal within VS Code to access your projects. Using the provided terminal is of course valid.
Mac
Steps here are specific to Mac, don't forget to check the general initial setup as well!
Python
Mac ships with Python!
...but its Python 2.7...
So it's very important that you _do not use your system Python to write code, since everything we'll be writing will be Python 3!
The guide 'Installing Python 3 on Mac OS X' over in the 'The Hitchhiker's Guide to Python' is great.
Terminal
Mac is also ships with a terminal, for our use cases, the built in one is indeed fine.
If you're feeling fancy, give something like iTerm2 a chance.
If you're feeling dangerous, try a hit of Alacritty or Kitty.
VS Code
https://code.visualstudio.com/docs/setup/mac
Linux
Steps here are specific to Linux, don't forget to check the general initial setup as well!
Python
https://docs.python-guide.org/starting/install3/linux/
Terminal
Whatever terminal ships with your distro. is probably fine, here is a list of 'the best ones' though.
VS Code
https://code.visualstudio.com/docs/setup/linux
Terminals, Code Editors, and You
This section covers the development environment; things that will help you become a more efficient and productive programmer.
Quick Terminal Overview
Almost every operating system is equipped with a command-line interface or 'terminal', AKA Command Prompt on Windows. Terminals allow you to send commands to your computer to do various things like file management, installing applications, or controlling system configurations. In a nutSHELL, almost anything you can do with your mouse and keyboard can be done using commands.
- Terminal = text input/output environment
- Shell = command line interpreter
Why command-line?
1. Things can get done quicker
Okay hear me out, lets say you have a directory full of mixed type files and you want to delete all the .png files but keep the rest; how long will that take you to do using your mouse and keyboard? Your answer doesn't matter, because this is how fast it is using a command:
rm *.png
2. You're in full control
Command-line allows you to be in full control of your system. Things like configuring system settings, killing and starting tasks, managing services and quick installation of packages and applications can all be done efficiently and less error prone through command-line.
3. You look like a hacker using Terminal
Yes.
Useful Commands
ls— List directory contents- e.g.
ls -awill list all files and folders including hidden ones
- e.g.
echo— Prints text to the terminal window- e.g.
echo hellowill print 'hello' in next line
- e.g.
touch— Creates a file- e.g.
touch app.pywill create a python app file in current directory
- e.g.
mkdir— Create a directory- e.g.
mkdir projectscreates a folder 'projects' in current directory
- e.g.
cd— Change directory- e.g. After creating the 'projects' folder, you can enter it with
cd projects
- e.g. After creating the 'projects' folder, you can enter it with
man— Print manual or get help for a command- e.g.
man mkdirwill open the manual of how to use themkdircommand
- e.g.
pwd— Print working directoryclear— Clear your terminal windowrm— Removes file- e.g.
rm app.pyremoves the app file you made
- e.g.
Aliases
You can create your own custom commands based on existing commands, for example:
alias c = “clear”
By running the above command you have created an alias for the command clear to be also recognized by typing the character c; hence if you type c in the next line, your terminal screen wil be cleared.
Editing Code with Ease
Pimp my VSCode
VSCode is great because it allows you to take control of your editing enviorment and download 3rd party extentions to help with your dev work flow. In this section we will go through some of our favorite VSCode extenstions.
Themes
Themes are greate for siwtching up what your editor look and choosing a preferred color scheme. Some themes we recommend include:
Linters and Intellisense
These extentions help with things like catching erros, auto completition, syntax highlighting, and parameter info.
-
Python Provides rich support for the Python, including features such as IntelliSense, linting, debugging, code navigation, code formatting, Jupyter notebook support, refactoring, variable explorer, test explorer, and more.
-
Prettier Enforces a consistent style by parsing your code and re-printing it with its own rules for javascript, JSON, CSS, HTML and many more.
-
Visual Studio IntelliCode provides AI-assisted development features for Python, TypeScript JavaScript and Java.
-
Discord Presence Shows what you are editing in VSCode on Discord.
-
Live Share Enables you to collaboratively edit and debug with others in real time.
-
Code Spell Checker A basic spell checker that works well with camelCase code.
Git, and GitHub
Git
Git itself is a version control system, which allows you to manage changes to things such as computer programs (but not limited to), in a manner that allows you to both view a history of all changes, and collaborate with others much easier.
Git itself is not a huge focus of this bootcamp, other than using it to clone and commit, we will likely not be discussing a lot of its main features such as branching and rebasing, but since we're using GitHub to host our own code, and will be encouraging everyone to do the same for their own work, we will be learning a bit!
More information on the basics of Git can be found here.
GitHub
GitHub, itself, is a website, it is not Git, but obviously by its title it has a lot in common with Git.
Explained best in this stack overflow answer,
Git is a revision control system, a tool to manage your source code history.
GitHub is a hosting service for Git repositories.
So they are not the same thing: Git is the tool, GitHub is the service for projects that use Git
As mentioned in the initial setup, creating a GitHub account is something we've already asked you to do.
GitHub themselves have a nice 'Hello World' guide on how to get started here.
Jack has already given multiple sessions on GitHub outside of this bootcamp, one of which can be found online here:
Why bother using git?
Git Tower has a nice summary of the whys of Version Control Systems (indirectly Git, since Git is a VCS).
They first talk about Collaboration:
Without a VCS in place, you're probably working together in a shared folder on the same set of files. Shouting through the office that you are currently working on file "xyz" and that, meanwhile, your teammates should keep their fingers off is not an acceptable workflow. It's extremely error-prone as you're essentially doing open-heart surgery all the time: sooner or later, someone will overwrite someone else's changes.
And follow up with storing versions of things properly:
Saving a version of your project after making changes is an essential habit. But without a VCS, this becomes tedious and confusing very quickly:
How much do you save? Only the changed files or the complete project? In the first case, you'll have a hard time viewing the complete project at any point in time - in the latter case, you'll have huge amounts of unnecessary data lying on your hard drive.
How do you name these versions? If you're a very organized person, you might be able to stick to an actually comprehensible naming scheme (if you're happy with "acme-inc-redesign-2013-11-12-v23"). However, as soon as it comes to variants (say, you need to prepare one version with the header area and one without it), chances are good you'll eventually lose track.
The most important question, however, is probably this one: How do you know what exactly is different in these versions? Very few people actually take the time to carefully document each important change and include this in a README file in the project folder.
The other three are restoring previous versions, which relates to the previous, understanding what happens, and backup, all of which can be found on this page.
How does git even work?
This is going to get a bit technical very quickly, and is most definitely targeted towards the computer science folk, but Git, at the data structure and algorithms level, uses a directed acyclic graph to store all of its data under the hood.

The magic of Git too, is that once you enter a directory and run git init, all it stores locally is a folder in that directory named .git, there is no Git 'server' or even a centralized location where it stores files (other than configuration, but that is optional)
To give an example, the very repository you are viewing as a website right now as seen from the command line:

More about said internals can be found here.
Web Server
Since one of the main goals of this bootcamp is for you to build a website, it makes sense that it's a good idea to have a good grasp on what exactly is a website beforehand, from a more technical level.
Websites are something you interact with quite often; you're interacting with one right now, and thankfully as an end user, you don't have to care much to how they work, but if you intend on making websites, it helps to build a better view of how they work.
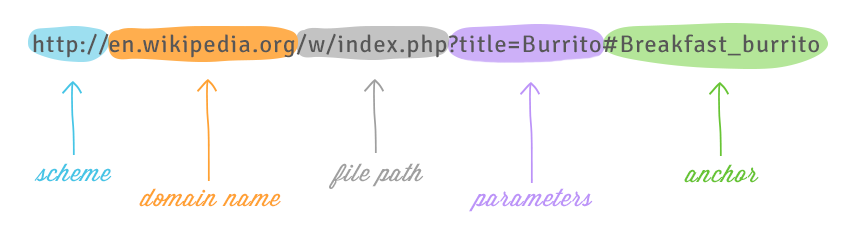
URLs
What is a URL exactly?
URL, which stands for Uniform Resource Locators, is an 'address of a given unique resource on the web'.
MDN explains this quite well here.
...A URL is nothing more than the address of a given unique resource on the Web. In theory, each valid URL points to a unique resource. Such resources can be an HTML page, a CSS document, an image, etc. In practice, there are some exceptions, the most common being a URL pointing to a resource that no longer exists or that has moved. As the resource represented by the URL and the URL itself are handled by the Web server, it is up to the owner of the web server to carefully manage that resource and its associated URL.
To use an example, lets talk about the very website you are on.
https://hackfrostnl.github.io/
Here, we are using the scheme 'https', we are on the subdomain 'hackfrostnl' of the domain 'github.io' (which itself has a top level domain of 'io'), on the path '/'
https://hackfrostnl.github.io/dev-bootcamp-v1.0/web/overview.html
In this circumstance, we are on the same exact scheme / subdomain / domain, but our path is different, it is now '/dev-bootcamp-v1.0/web/overview.html', hence you are viewing this section, and not a different one.
HTTP
Every URL you have ever seen, starts with http, but what exactly is HTTP?
Hypertext Transfer Protocol (HTTP) is an application-layer protocol for transmitting hypermedia documents, such as HTML. It was designed for communication between web browsers and web servers, but it can also be used for other purposes. HTTP follows a classical client-server model, with a client opening a connection to make a request, then waiting until it receives a response. HTTP is a stateless protocol, meaning that the server does not keep any data (state) between two requests.

When you connect to this webpage to download the content, your browser creates a HTTP request to GitHub, and GitHub responds with a document your browser understands, dependent on the request that you made.
Flask
Flask is the web framework of choice for this bootcamp, it is built for Python, and makes writing websites a lot more accessible to average developers.
Each example here shows how to build a different simple website using Flask.
Development Server
While you're working on your application, it's a good idea to enable the development mode, so you'll get an interactive debugger, and reloading when code changes.
https://flask.palletsprojects.com/en/2.0.x/server/.
Example 1 - Hello, Flask!
Any good 'first program' requires a hello world, so we're going to be building a website, in which its only goal is to return the string 'Hello World!'.
This tutorial is taken from Flasks own website.
Setting up our Environment
This assumes you have completed the initial setup, such as having the latest version of Python, and a capable editor.
Enter where you want to be, and create the directory
cd /somewhere/on/my/computer/i/want/to/put/this
mkdir hello-flask
cd hello-flask
pwd # ensure you are where you expect to be on your system!
Create a virtual environment, activate it, install Flask
Covered in more detail here.
cd /somewhere/on/my/computer/i/want/to/put/this/hello-flask
python3 -m venv venv
. venv/bin/activate
pip install Flask
Create the main file, fill it with the hello world code
cd /somewhere/on/my/computer/i/want/to/put/this/hello-flask
touch app.py
Open up the newly created app.py in your editor of choice, and fill it with this code:
from flask import Flask

app = Flask(__name__)

@app.route("/")
def hello_world():
    return "<p>Hello, World!</p>"
An overview of this code from the Flask Quickstart guide:
First we imported the Flask class. An instance of this class will be our WSGI application.
Next we create an instance of this class. The first argument is the name of the application’s module or package.
__name__is a convenient shortcut for this that is appropriate for most cases. This is needed so that Flask knows where to look for resources such as templates and static files.We then use the route() decorator to tell Flask what URL should trigger our function.
The function returns the message we want to display in the user’s browser. The default content type is HTML, so HTML in the string will be rendered by the browser.
Run the website
cd /somewhere/on/my/computer/i/want/to/put/this/hello-flask
flask run
Open up your browser to http://localhost:5000/, and you should see this:

A nice empty white page with the text 'Hello, World!'
Example 2 - Flask Math
Follow the same steps as the first example, but instead use this code:
from flask import Flask

app = Flask(__name__)

@app.route("/")
def hello_world():
    return "<p>Flask Math</p>"

@app.route('/<int:number>')
def display_number(number):
    """ Displays a number back to the user as-is """
    return str(number)

@app.route('/<int:x>/add/<int:y>')
def add(x, y):
    """ Adds x and y, returns result """
    return str(x + y)

@app.route('/<int:x>/subtract/<int:y>')
def subtract(x, y):
    """ Subtracts y from x, returns result """
    return str(x - y)
Here, we're using routing within flask, and variable rules to take in input from the user, ensure we get it as a number, do some math, and return it back as a string.
Uses of this app include:
http://localhost:5000/10 , displays
10in the browserhttp://localhost:5000/10/add/20, returns
30http://localhost:5000/10/subtract/20, returns
-10
Try and take this code, and add some more math functions, such as multiplication and division, or go nuts and make it solve arbitrary equations, its up to you!
Example 3 - Rainbow Flask
Follow the same steps as the first example, but instead use this code:
import random
from flask import Flask

app = Flask(__name__)

def random_color():
    return "#{:06x}".format(random.randint(0, 0xFFFFFF))

@app.route("/")
def rainbow():
    return f"""
<head>
    <style>
        body {{
            background-color: {random_color()}
        }}
    </style>
</head>
<body>
    <p>Rainbow Flask</p>
</body>
    """
Here, we import the random module, and we define a function that returns a random hex color.
This route also contains a bit of HTML, something the previous examples have very little of, because we want to style the background an arbitrary color, this will be covered in more detail later, but for now, if you run this, you will get a page that each time you refresh, will display a piece of text like before, but with a random colorful background!